Advertisement

120g caster sugar

preparation 1 mins • you cook for 4 mins •
Makes a sugar nest, sugar basket and sugar twirl
Watch a 30 second preview of my cook-along video below
Spun sugar is that fancy stuff that adorns the top of great looking desserts. It might look quite difficult but with a little practise is actually quite straightforward. In this demonstration video, I show you how to melt the sugar correctly and make a sugar nest, a basket and a twirl. Have a go as the rewards far outweigh the difficulty and soon you'll have professional looking desserts to show off!
Small saucepan or omelette frying pan
Ladle
Sharpening steel or the handle of a wooden spoon - anything shaped like that
Baking parchment
Advertisement
This is a demonstration video and as such doesn't lend itself to cooking-along. Watch of the video to see how it's done, then try it yourself and have fun!. Click here for the video!
Advertisement
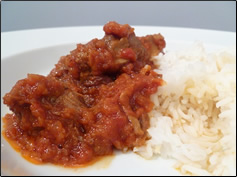
This week's newsletter recipe is for my Tangy Lamb Tagine. This is a great dish packed with flavour - all you have to do is throw a bunch of ingredients in a pot and let them cook for a couple of hours and the result is magic! Slow cooked lamb shoulder, with the sweetness of apricot and the gentle heat of cayenne pepper - this dish will warm up your senses in no time.
Throughout November, the theme for my newsletters is 'Winter Warmers'. Each of this month's delicious recipes contain just enough spice to warm those winter months. I have 4 great exclusive recipes and cook-along videos for you, from Satay Pork to Curried Cauliflower Soup. With valuable cooking tips & fun food news from around the web, sign up for free today.
Simply enter your email address - it won't go to 3rd parties and you won't receive any junk mail!
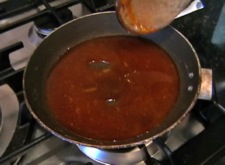
Put the sugar into a small saucepan or mini-frying pan on the hob on a medium heat. As the sugar warms, the caramelisation process will begin. The first thing you'll notice after about a minute is the smell of caramel, then the edges of the sugar starting to brown. Shake the pan around just a little to mix the sugar. Gently stir the pan to make sure there are no big bits of uncaramelised sugar. Once the whole pan has turned a lovely brown colour and has completely liquified, turn the heat off and allow the pan to cool for about a minute. You need to start your sugar work at the point when the caramel has thickened enough to drip in long fine strands off a fork. It shouldn't pour off the fork like water.
Note that the pan will inevitably cool too much if you're taking a while to try out different decorations. Don't worry - simply pop the pan back on the heat for anything between 10-30 seconds to soften the sugar again.
Sugar nest
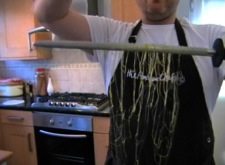
Stir the pan with your fork and then hold it up about 10 inches above a sharpening steel in your other hand. Flick the caramel from the fork, over the steel, as in the photo to the right. This will create very fine strands of sugar that you can then bring together in your hands and form into a ball (as in my chocolate mousse recipe).
Sugar basket
This uses the back of a metal ladle instead of a sharpening steel. In exactly the same way as before, load up your fork with caramel and drip it over the back of the ladle. As the sugar hits the metal, it will harden, allowing you to create criss-cross lines over the ladle. Carefully lift the sugar off and marvel at your little sugar basket.
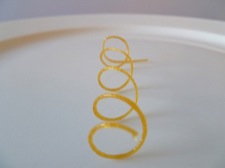
Sugar spiral
This decoration is the most difficult because it requires the sugar to be at the precise point that it is almost hardening. If it's too soft, then you won't be able to spiral it around the sharpening steel, but too hard and it won't bend around the steel at all. With your sugar laden fork in one hand and the steel in the other, drizzle some caramel over a little parchment paper until you get the final ultra fine strands. Now spiral the long fine strands over and under the steel, moving along in a spiral. This one will take some practise but probably is the most rewarding because it looks the best!
Advertisement

All content © 2012 TheAmateurChef.co.uk - Privacy Policy